
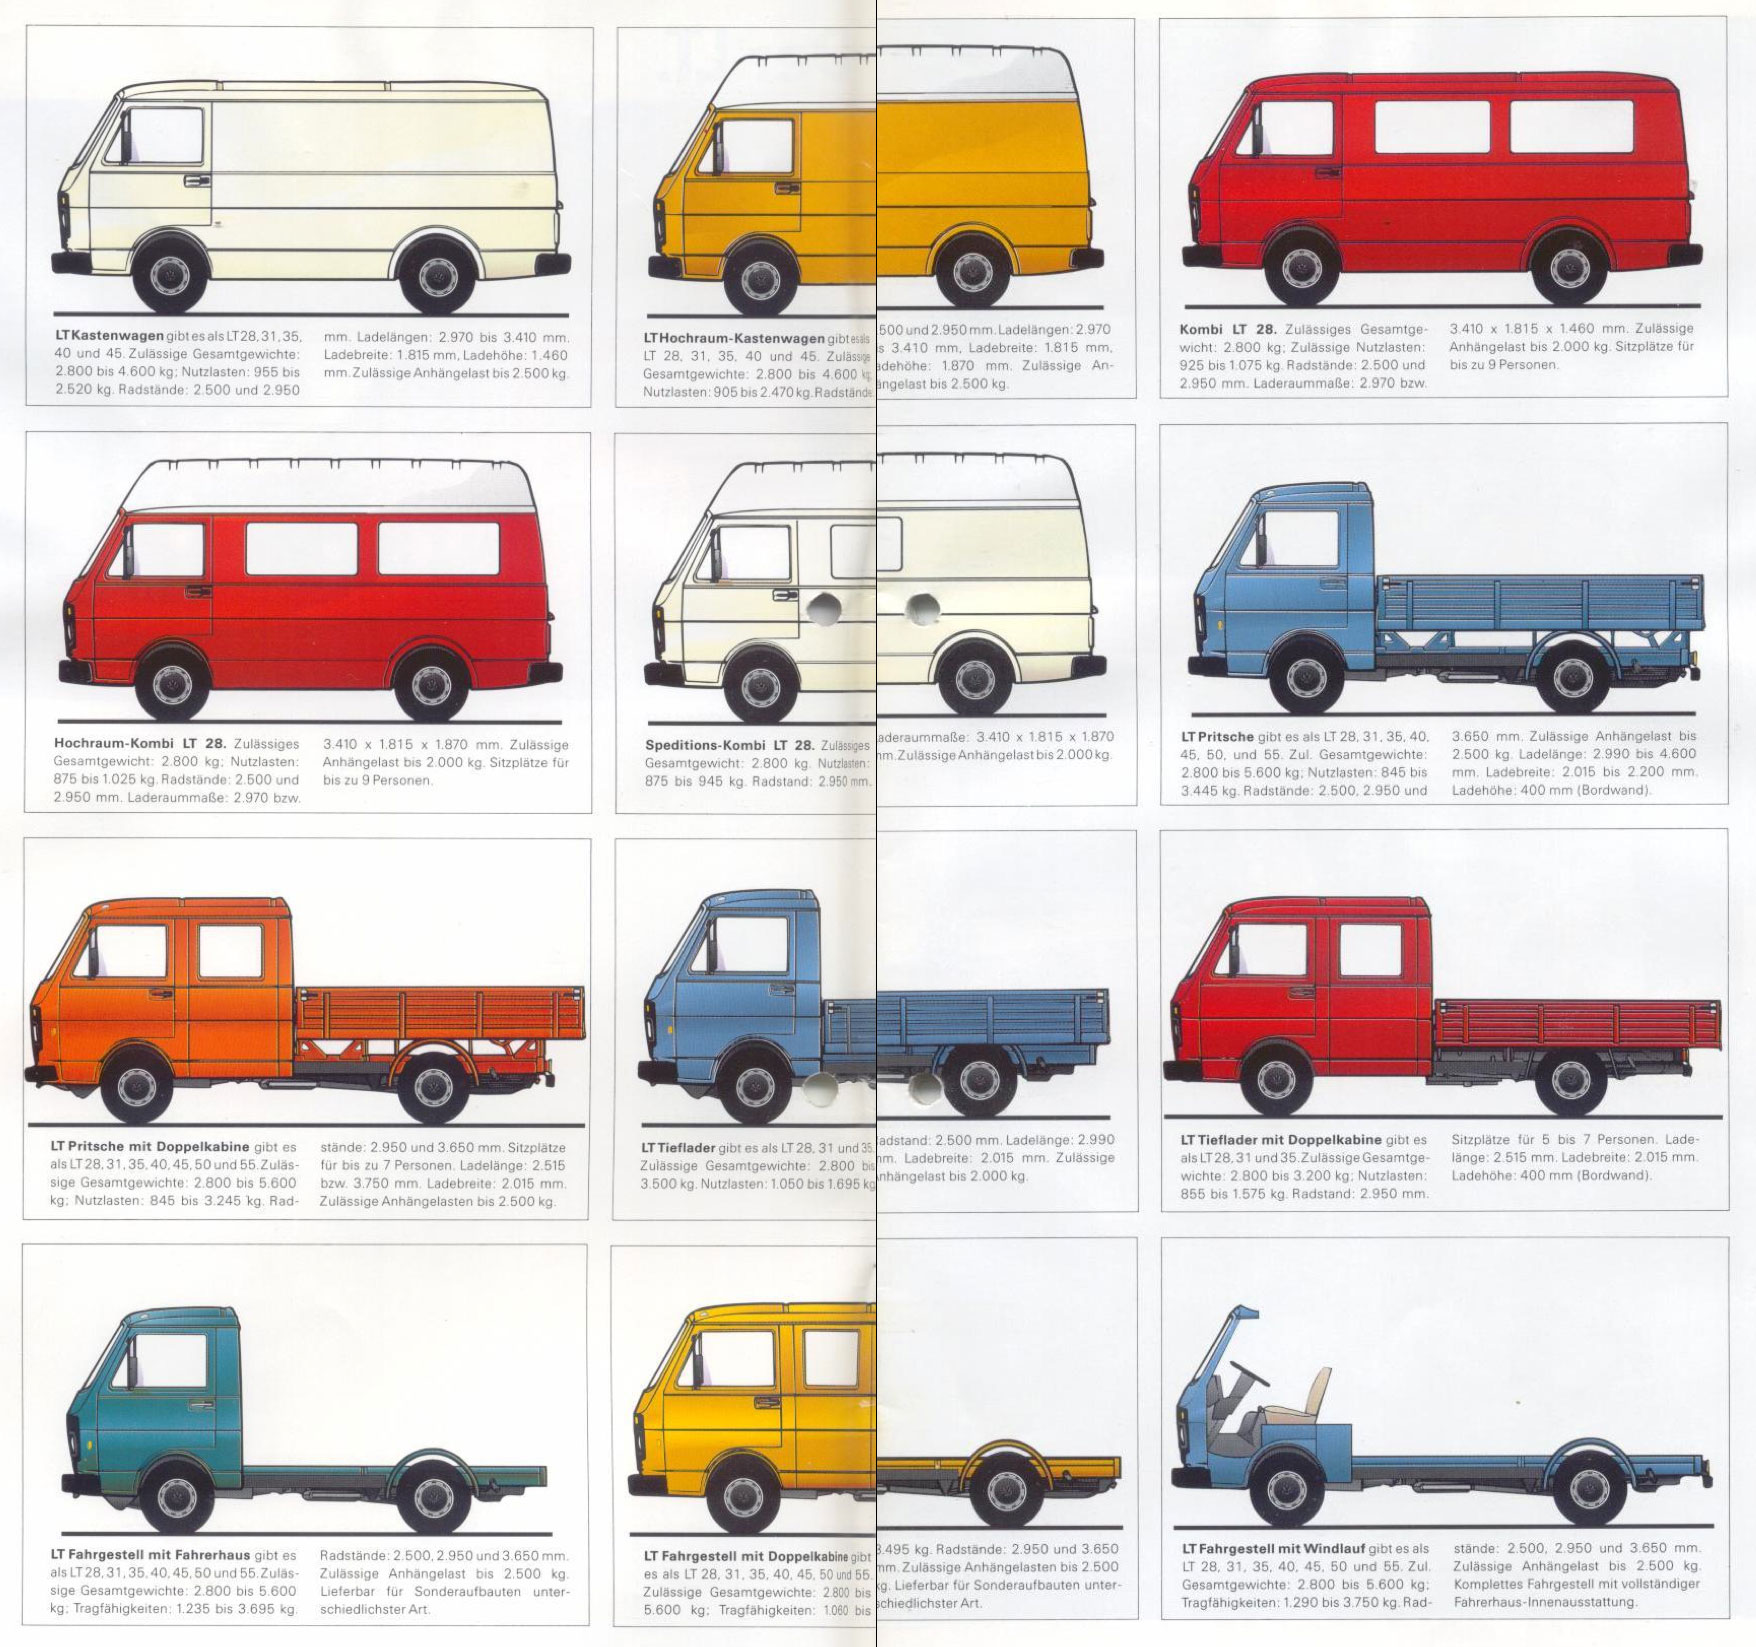
Table of Contents:
Petrol:
2.0 L I4 (1975-1982)
2.4 L I6 (1983-1996)
Diesel:
2.7 L Perkins I4 (1976-1977)
2.4 L D24 I6 (1978-1996)
2.4 L D24T turbo I6 (1983-1992)
2.4 L D24TIC turbo I6 (1993-1996)
Guide to engine codes here on Wikipedia.
Manuals:
4 cylinder petrol.pdf
4 cylinder diesel.pdf
6 cylinder petrol.pdf
6 cylinder diesel.pdf
In a recent poll on the VOLT Facebook group the ACL engine appears to be the most commonly fitted:
When buying second hand (i.e. every time!):
Check under the footwell carpet for rot, and in the dash pod for corrosion on the electrics in there, may be an idea to check all lights and indicators are switching on OK and fuel+heat gauges register if the electrics have moisture in them these may be faulty. LT’s are notorious for water ingress into the cab which can gather under the floor mat seemingly appearing from nowhere. Many state leaks around the indicators as the cause, but the lower corners of the windscreen hold water which can leech under the rubber seal, as it ages, and begins its’ journey into the cab. The left hand corner is the directly above the fusebox and gives most concern in right hand drive countries. This is not unusual but can of course lead to rust if not addressed, so… watch for if there has been water ingress is has it started to rot either the interior, beds and units etc. Also check around the handbrake where a rubber grommet is often missing allowing spray to come up around the handbrake into the cab. Seams all around the van are prone to rust due to poor drainage when blocked, an original design flaw.
∧∧∧Back to top
Body
It’s unlikely you’ll find a mk 1 (pre-’96) LT without body work issues. However panels are still available to order so don’t let rust or even welding put you off buying, restoring and keeping. Sills were an LT weak point as are front foot wells and rear wheel arches, and rear corners.
∧∧∧Back to top
Coachbuilts
The big thing in these big things is damp, usually from the joints in the surface skin. If you are looking at a coachbuilt buy a damp meter, from under 10GBP, and check as many areas you can as close to the outer skin as you can. The time of year will have a bearing upon the results. The area around the shower, if fitted, should also be checked. This advice applies to any coachbuilt camper, but it seems that the Karmann coachbuilts on the LT are particularly prone to water ingress at the front and sides of the bed over the cab.
Reading Value Action
0 – 15% No Cause for concern
15-20% Require further investigation Consideration should be given to re-checking the area in three months with the average of all readings taken.
20-30% Remedial work required, there may be early signs of water ingress or evidence of moisture. Resealing and internal work may be required; again, consideration should be given to re-checking the area in three months.
30% Structural damage is occurring, deterioration inevitable. a full strip down of the affected area is required.
Be aware though, that if the vehicle has been stored under a cover and not aired recently, the readings may not be accurate.
∧∧∧Back to top
Seams
As you are probably aware, LT’s tend to rust a little around the body seams, due to modern manufacturing techniques, body tolerances and panel fit have come along way since the “bay window” van (’68-’79) but once muck is in there you are going to have great difficulty getting it out, so be warned. Walk away from a van with rot around the seams unless you are confident you can get rid of it. Most vans are now getting to that age where a little crispiness around the edges is inevitable, also check that all the seams that are meant to be there actually are! A lot of repairers either weld the seams up or fill over them, it WILL be hiding something! Take a magnet with you, if it does not stick, there is no steel.
∧∧∧Back to top
Gutters
With the size of the LT it is quite difficult to wash the roof and gutters so they are often overlooked and hence get blocked which holds water against the panels which eventually leads to corrosion. Some camper conversions featured the addition of high top roofs which involved additional sealant in the gutters. If water is allowed to get under this sealant it can cause a real problem not only in the gutters but down behind them and under the sealant if not addressed. Roof racks also scratch the paint around this vulnerable area and impede the free flow of water away, so when you are going to inspect a van, take something to stand on and take a good look at the state of the guttering (or cantrail to give it its correct name). It is a good idea to give the gutters a good clean out once in a while with some cutting compound or T-cut and give them a thin layer of protective wax such as Finigans Waxoyle.
∧∧∧Back to top
Windows
Sounds silly doesn’t it?, well I’ll explain… it is not actually the windows, rather its frame or surround, windscreen surrounds are prone to corrosion in the bottom corners normally noticed by a small pool of water in the foot wells after rain, although you can’t go pulling someone’s windscreen out when you are thinking of buying it you can probably get away with lifting the corner of the rubber with a small screw driver and having a little sneaky peaky underneath for brown crispy bits, or alternatively you can have a look at the underside from under the dashboard (so remember your torch!). It’s not just the screen you have to watch out for, its converted panel vans, these are the vehicles that left the factory as a delivery van and have had windows “cut” into them. When the hole is cut for the window, the bare metal isn’t often primed or painted so the first time it rains the water runs behind the seal and sits there rotting the metal so watch out for bubbles around these windows.
Factory fitted windows should give you no problems. Some of these parts are still available from VW but alternative sources of similar parts can be used.
∧∧∧Back to top
Front wheel arches
They are a bit of a water trap and hold mud (therefore water) against the interior of the arch. Regular washing is the answer here but if it has already taken hold then watch out for M.O.T failures as the top of the wheelarch lies within the prescribed 30 cm of a seat belt mounting. So check under the matting around the seat belt mounts. Also watch out for the cab step as the rubber anti slip thing holds water underneath it also leading to rot.
∧∧∧Back to top
Rear wheel arches
Without mudflaps to protect the chassis behind the wheels road crud will collect in the holes, ledges and gaps in the chassis and the sills. The chassis tends to come off relatively unharmed, but the thinner metalwork can disappear. Most rear panels are available, and even some floor panels and chassis members are still available from VWClassic.
∧∧∧Back to top
Fuel tank
Feel free to add content here.
∧∧∧Back to top
Doors
Not many problems here, just the window winder knobs fall off just like the rest of the VW’s of the same era. The use of later MK III polo style winders usually works. Window winder mechanisms wear, easy to repair. Doors are interchangeable between years. Window wipers are shared with T3s and so are easily found and replaced. The same problem of water ingress and therefore rust in between the doorskins will ensue.
∧∧∧Back to top
Rear Doors
Not many problems here either, doors are interchangeable. Water can enter through the numberplate light and numberplate mounting holes. It sits in between the skins and corrodes its’ own drain. The door handles and locks do not get used as often as a slider and so can become stiff.
∧∧∧Back to top
Sliding door
(Side loading door). These rot a little along the bottom edge, also watch out for worn door runner bearings resulting in a less than smooth operation of the door.Some sliding door parts are shared with the Bays and T3s which are therefore more easily available.
∧∧∧Back to top
Running gear
A very contentious issue this one.
Firstly, the specifications
- LT28 and LT31 are 5×160 6J14H2 ET51 with M14x1.5 bolts/nuts which have a 60 degree taper
- LT35-LT55 are 6×205 5J14H2 ET120 with M18x1.5 nuts.
5×160/6×205 indicates the number of fixings, 5 or 6, and the pitch circle diameter (PCD) this is the diameter of the circle on which the fixings are centred.
6J/5J. The number indicates the width of the wheel in inches and the letter, the bead profile of the rim.
H2 indicates the double hump profile of the wheel.
ET51/ET120 indicates the offset from the vertical centre of the wheel to the mounting surface.
Although American, this page is useful.http://www.carbibles.com/tyre_bible_pg4.html
Secondly, the contentious part.
LTs are commercial vehicles. The boffins at VW designed the wheels, hubs and fixings, to take the stresses and strains of a fully loaded LT bouncing around on them.
Other manufacturers wheels do ‘fit’ in that they have the same 5×160/6×205 fixings. Wheels can be fitted, through the use of adaptors or redrilling, which have different fixings.
For Lt28/31/35e LT fits (naturally), some Transit wheels fit (after modification), Tata wheels fit (with no modification), Defender wheels fit (with special screws)
This page has useful information. http://www.carlsalter.com/wheel_fitments_by_pcd.html
ANY changes to wheels MUST be passed on the your insurance company.
∧∧∧Back to top
Front suspension
LT28 and LT 31 have coil springs, and all others, LT35-50 use a leaf-sprung beam, including 4×4. Shock absorbers on coil-sprung vehicles should be checked for leaks, but replacements are readily available. Always replace in pairs.
∧∧∧Back to top
Rear suspension
Leaves are supposed to look sad, ie higher in the middle.
∧∧∧Back to top
Front brakes
Feel free to add content here.
∧∧∧Back to top
Rear brakes
The automatic adjusters never seem to work as they should, one of the tags on the back plates corrode and fall off and that’s about it, nothing is hard to replace, cables are straight forward to do, unless they have affixed themselves to the flimsy backplates. Rear brake adjuster bars wear which don’t allow the rear brakes to adjust as they should, this can be rectified by clever filing of the bar.
∧∧∧Back to top
Brake Pressure Regulator
This is the valve above the rear axle which distributes braking force so when empty there is less braking force at the rear wheels, therefore preventing locking up. When loaded, the variable nature of the valve automatically adjusts the braking force so the rear wheels can help more. Before you consider removing it, because it is leaking, that scenario is covered in the MOT test by ‘Evidence that a load sensing valve has been removed or disconnected from a vehicle where it is known to have been fitted as standard ’
They have not been available from VW for a long time, however all is not lost. DAF/Ford/Scania 1518097 is the same part, if you can find one.
The only new parts found so far, 13th February 2016, here.
Parts and breakdown, and of course one of our German friends can rebuild them.
http://www.lt1-forum.de/dokuwiki/doku.php?id=start:reparaturtips:bremskraftregler_instandsetzen
http://www.lt1-forum.de/dokuwiki/doku.php?id=start:reparaturtips:bremskraftregler_wabco_hinterachse
http://www.lt-forum.de/dokuwiki/doku.php?id=start:reparaturtips:bremskraftregler_reparieren
http://www.lt-forum.de/dokuwiki/doku.php?id=start:reparaturtips:bremskraftregler_instandsetzen
Volition82 on Brickyard has replaced his with a modern one and a little bit of mathematics.
http://www.brick-yard.co.uk/forum/rear-brake-pressure-regulator-booster_topic81142_page1.html
∧∧∧Back to top
Gearbox
4 and 5 speed manual gearboxes were available. Regular oil changes are a good idea. An leak oil out of the bell housing, the seal is cheap but you have to take the gearbox out. Don’t be put off by a 4 speed box Gearboxes are broadly indestructible, but do not attempt bumpstarting in reverse, it will probably end badly. The earlier LTs had a four-speed gearbox. It can be swapped for the later fiver-speed but it is only the gap between gears which changes, and not the top gear. First gear is also slightly lower in the five-speed.
∧∧∧Back to top
Differential
Not much to say, except they are not all the same. There are fast and slow ones, 3.79:1 to 6.43:1. Originally matched to specific engines with specific torque curves, nowadays anything goes.
http://www.lt1-forum.de/dokuwiki/doku.php?id=start:wichtige_daten:hinterachse
∧∧∧Back to top
Rear Axle
From new VW gave the option for different speed ratios on the rear axle so many have reported different top speeds. The German LT Freunde wiki has information on the codes and the ratios: http://www.lt-forum.de/dokuwiki/doku.php?id=start%3Awichtige_daten%3Ahinterachse If you’ve got the highest speed rear axle it should go well over 90 (for a short time!) and cruise happily at 75 ish…
∧∧∧Back to top
Electrics
They don’t seem that bad It is just when someone has been messing with them!, Have a poke under the dash and look for scotch locks (or bodge locks as I like to call them) they are those little blue connectors that you squeeze together with pliers, they are OK but…… The printed circuit on the back of the instrument cluster is prone to burning out where it goes around corners and the connector that connects it to the loom often corrodes and causes trouble it is not a risk you want to take so make sure all the warning lights and the dash illumination works, if the fuel gauge and temperature gauges do not work this is probably a diode on the foil, easily repaired,doesn’t work it could be a few things and could lead to fuel tank removal so check it! The youngest wiring is twenty years old now, 2015, and the oldest forty, so oxidisation will have happened within the looms.
∧∧∧Back to top
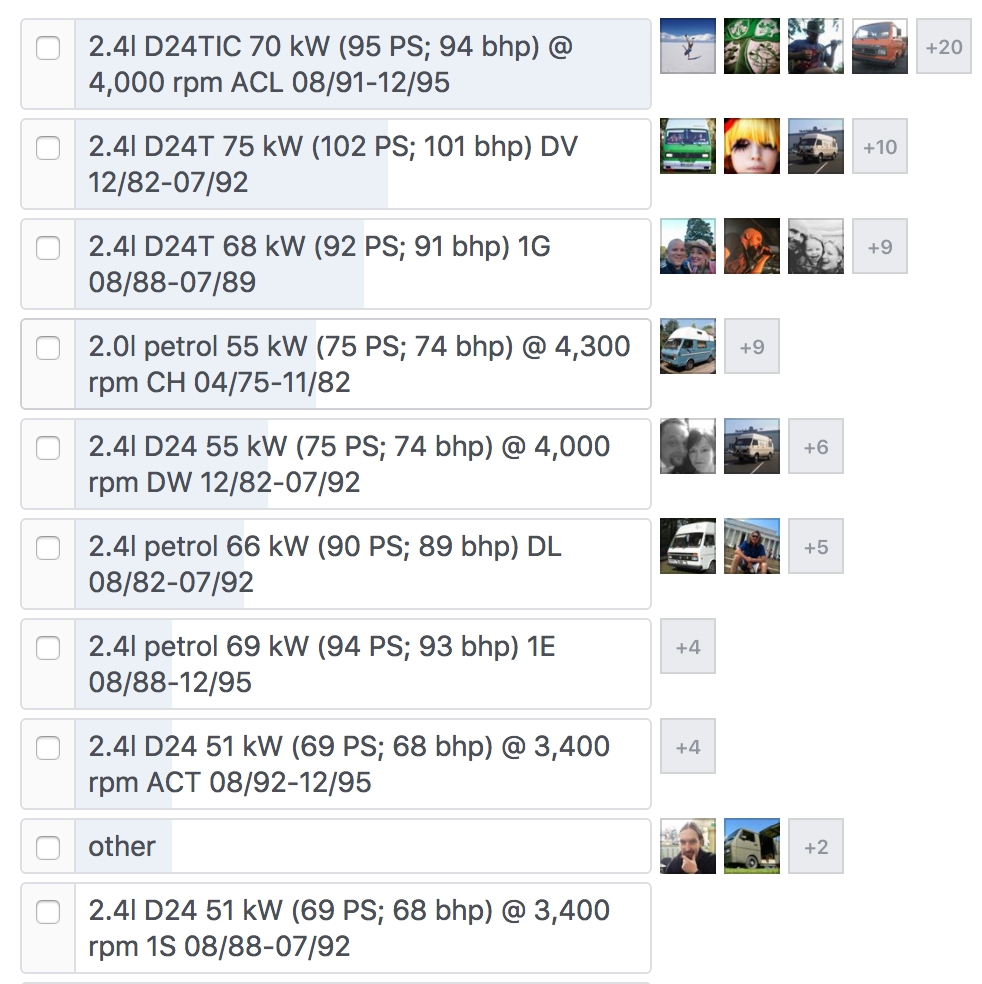
Engines
There are a few different engines to choose from, to be brutally honest none of the engines are brilliant, the later ACL and 1E would be preferred, it is just which one do you go for. ALL of the petrol engine available for use in the UK are capable of running on unleaded fuel with little or no alterations. LPG conversions help with fuel consumption.
For engine transplants see this forum thread: http://vwlt.co.uk/forum/discussion/5/engine-transplants
The following tables were taken from http://www.lt1-forum.de/dokuwiki/doku.php?id=start:wichtige_daten:daten_motoren
| Petrol | |||||
| Designation | CH | CL | DL | HS | 1E |
| Cylinders | 4 | 4 | 6 | 6 | 6 |
| Capacity cm3 | 1960 | 1984 | 2383 | 2383 | 2383 |
| Installation | Long, vertical | Long, vertical | Long, sloping | Long, sloping | Long, sloping |
| Built from | 1 Aug 75 | 1 May 76 | 1 Jan 83 | 1 Apr 83 | 1 Oct 88 |
| Built to | 1 Dec 82 | 1 Dec 82 | Production ends 95 | 1 Jul 86 | Production ends 95 |
| Power (kW) | 55 | 52 | 66 | 61 | 69 |
| Power (PS) | 75 | 71 | 90 | 83 | 94 |
| @rpm | 4300 | 4300 | 4500 | 4500 | 4200 |
| Torque (Nm) | 150 | 132 | 168 | 160 | 167 |
| @rpm | 2400 | 2400 | 2800 | 2800 | 2400 |
| NA Diesel | |||||
| Designation | CG | CP | DW | 1S | ACT |
| Cylinders | 4 | 6 | 6 | 6 | 6 |
| Capacity cm3 | 2710 | 2383 | 2383 | 2383 | 2383 |
| Installation | Long, vertical | Long, vertical | Long, sloping | Long, sloping | Long, sloping |
| Built from | Jan 76 | Nov 78 | 01/12/82 | Aug 89 | Aug 92 |
| Built to | 01/03/79 | Nov 82 | Jul 91 | Jul 92 | Production ends 95 |
| Power (kW) | 48 | 55 | 55 | 51 | 51 |
| Power (PS) | 65 | 75 | 75 | 69 | 69 |
| @rpm | 3600 | 4300 | 4300 | 3400 | 3700-3800 |
| Torque (Nm) | 152 | 140 | 140 | 145 | 140 |
| @rpm | 2300 | 2500 | 2500 | 1600-1800 | 1800-3000 |
| Turbodiesel | |||||
| Designation | DV | 1G | ACL | ||
| Cylinders | 6 | 6 | 6 | ||
| Capacity cm3 | 2383 | 2383 | 2383 | ||
| Installation | Long, sloping | Long, sloping | Long, sloping | ||
| Built from | Jan 83 | 01/08/1989* | Aug 92 | ||
| Built to | Jul 91 | Jul 92 | Production ends 95 | ||
| Power (kW) | 75 | 68 | 70 | ||
| Power (PS) | 102 | 92 | 95 | ||
| @rpm | 4300 | 3500 | 3500 | ||
| Torque (Nm) | 195 | 195 | 205 | ||
| @rpm | 2500-2600 | 1800-3100 | 2200-3200 | ||
| *Export 88 | |||||
∧∧∧Back to top
Buying spares
Is the part you need available from VW?
For this exercise we will try to find an inner rear chassis member for a 1989 LT28.
Firstly, you need the part number. If you can see it marked on the part you have, that will make life easier, if not then one of these two online VAG catalogues will help.
EKTA There are various emulations of the VW part number database online some of which work better than others. Try OEMEPC or VW.7ZAP (http://www.oemepc.com/vw/main_group/markt/RDW/modell/LT/year/1989/hauptgruppen/1234567890/drive_standart/6/lang/e or https://volkswagen.7zap.com/en/rdw/) for after market part numbers.
Secondly, availability can be ascertained by using the part number in VW Classics’ stock monitoring system, which is also free.
Make a note of, or copy, the part number ready for insertion into the VW Heritagesearch dialogue, in this case 281803713C. The next stage is to access VW ClassicParts via VW Heritage
This part is in stock, and is priced at £120.25, today January 30th 2016.
Now you know it is in Germany, a phone call or email to Brickwerks(https://www.brickwerks.co.uk/) or VW Heritage will get your part winging its’ way to you in a couple of weeks.
Naturally, there are many third party manufacturers for items such as shock absorbers, ignition coils etc, but the part number will help you find the correct part more easily.