
Got a good VW LT garage to add? Leave a comment in the discussion tab…
Archives
VW LT 1 Load Sensing Valve Repair Guide
This document is not a “How To” document but meant as a guide for those who wish to attempt to repair this valve. I can not be responsible for inaccuracies contained within or problems that may occur with the end result.
A pre MOT health check on my 1996 LT35 panel van showed a leaking load sensor valve. Evidently there are none available anywhere, even in Germany. There are suggestions that valves from other vehicles can be adapted to fit. This sounded like a major modification to me, because if not done correctly it could result in the back wheels locking up and inducing a skid. If this caused an accident and the insurance company does not accept the modification, it will be your fault. I rejected this solution because of that. Getting a modification like this approved could be a headache. The alternative was to carry out a repair on the old valve. A Google search brought up a link to a repair on a German site:
http://www.lt-forum.de/dokuwiki/doku.php?id=start:reparaturtips:bremskraftregler_instandsetzen
This is excellent. Hit the translate to English Google button and it will get it mostly right. This inspired me to try a repair. I had nothing to lose after all without this part the van is to “slaughter” ( Google translation ) anyway. Here is the way I did it blow by blow.
Jobs in order:
- Pressure wash underside of van.
- Jack the chassis up away from the axle and support; this slackens the spring on the valve. If you are a reasonable size you can leave the wheels on the ground and chock them. There should be plenty of room to work underneath.
- Take the valve off. I gave it a good wire brushing and a soak in penetrating oil then slackened off the adjuster on the top of the spring to relieve the tension on the spring. I found a tight fitting open ended spanner to undo the 3 brake pipe unions. I did not block the brake pipes as I thought I would replace the fluid that runs out. If your fluid has been recently renewed you need to block the pipes with something. I used a silicone rubber sock for this.
A quick spanner job had the complete unit off and onto the work bench. The rubber dust boot was taken off and the spring retaining clip saved. - Clean and disassemble. The bleed nipple was soaked in penetrating fluid again. The unit was held firmly in a solid vice and the whole unit heated with an electric paint stripper blower gun. Do not get too hot, it needs to be hot too the touch only. There is plastic inside the body of the valve that will be damaged with too much heat. The nipple was then teased into submission by the use of a tight fitting ring spanner and lots of small taps with a small hammer on the spanner shaft immediately after heating and while it is still hot. Perseverance wins. It is the gentle vibrating of the hammer taps that eventually loosens it. If you break it off then it is the drill and tap technique as per above link. Next undo the large hexagon plug on end. Again hold firmly in vice, heat as above, and tease undone with a good fitting ring spanner and gentle taps with a hammer. Removing this plug revealed a thick creamy substance like jelly behind it, I think it should have been brake fluid, I can’t see how the unit could work efficiently like this and I guess that my valve hadn’t been working properly for years!! I could not move the piston behind it and it appeared to be seized up.Next job was getting the inside bits out. This is where the grease nipples come in. I bought 10 nipples from ebay for £3.48. I am not sure whether they are straight thread or taper. Taper thread can damage the threads in the body if tightened. I put mine in finger tight plus a gentle tweek with a pair of pliers. I didn’t mind if they leaked a bit but damaging the threads is a no no. Put one in each of the brake pipe holes, 3 in all. The internal pistons will be pumped out hydraulically with a grease gun from these nipplesBefore pumping the pistons out there is an internal sprung wire snap ring that needs to be taken out. This holds the piston in on the lever end of the unit. The piston needs to be compressed to reveal it and held in to take the snap ring out. I made a simple jig from scrap wood and a piece of M6 studding.
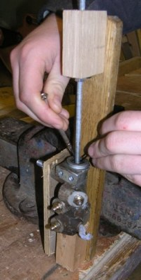
Figure 1 Removing the snap ring.
The piston was free so could be pushed down by hand easily. It was kept down by a nut on the studding. My son and I wriggled and jiggled with 2 small flat ended screwdrivers for 15 minutes and still could not get it out. It would move round go down and wedge but not move upwards and out. We had a cup of tea and cooled down!! I crept up on it a few minutes later, in with the same screw drivers and it popped out straight away. I can only think it is the element of surprise!! Don’t loose the snap ring. It has to be put back in on assembly.
Now to pump the pistons out with the grease gun. This is the way I should have done it. First pump out the piston behind the hexagon nut. To do this have the unit in the jig with the hexagon nut off and a pack (shaft of a large screwdriver) underneath it where the nut was. This will allow any grease to ooze out. Keep the lever piston securely in with the M6 studding and pump the centre nipple with grease. This released the ceased piston with a pop and yep, it hadn’t moved for years. The unit can then be taken out of the jig and the hexagon put back on finger tight.
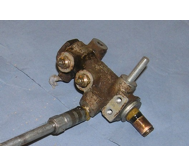
Figure 2 Pumping out second piston.
The lever end piston can now be pumped out. I took this lever end piston out first and then had to put it all back together again to be able to pressure the piston out at the hexagon nut end.
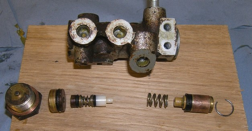
Figure 3 Internal bits in order
- Cleaning the grease from all of the parts and inspect. The cylinder looked to me to be perfect with no blemishes at all. The O rings looked complete but tired. I decided to renew the O rings. The correct size of O rings needed are stated in the Wabco manual for the valve and are large piston 2.4 X 13.3mm bore, smaller brass piston 2.4 X 5.3mm bore and the one on the plastic piston is 2.4 X 4.3mm bore. These are all available online from WWW.simplybearings.co.uk Bought in packs of 5 and are classed as Nitrile 70.
- Replace the O rings and seal. The new O rings went on the two brass pistons easily at hand temperature without any problem (a bit of silicone grease helps here ) however the small one looked impossible to get over the plastic piston to it’s seat. The German site mentions about egg shells and hot oil, something obviously went wrong in the translation!! I decided we needed a small carrot to put over the end of the plastic piston to slide the ring over. My wife came up with the idea of using a hard wax crayon found in the children’s toy box because it has a slippery surface. (I would have used a piece of wood). The crayon was turned up to be just a tad larger that the plastic piston. I used a lathe because I had one but I reckon you can whittle it away with a pen knife. I drilled a 4.5mm hole in the large end to slip over the nipple bit of the plastic piston and placed it in position.
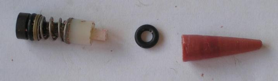
Figure 4 Before putting O ring on.
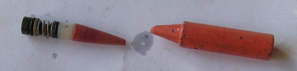
Figure 5 O ring on and spare crayon.
The whole assembly was then smeared with silicone grease. A saucepan of water was heated up on the hob and a small metal cup with some vegetable oil floated in it.
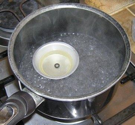
Figure 6 Cooking up O ring in vegetable oil.
When oil was hot (not boiling) the small O ring was dropped into the vegetable oil for about a minute. I took it out with a pair of tweezers and slipped it on the end of the carrot. The ring expanded easily and slithered up the carrot with minimal pressure straight onto the plastic plunger. Then just pull the spring and plastic seating washer back and let it fall in. YES !!!! I didn’t expect it to be that easy. Of course the wife took the credit.
The cup/U seal was loose in the seating. It should be a tight fit. This is where the fluid is leaking from so needs to be replaced. This can be sourced from Past Parts of Bury St Edmunds http://www.pastparts.co.uk/ Telephone 01284 750729. Ask for part number S9343. This is OK using Dot 4 brake fluid; if you use anything else ask their advice as to compatibility. This firm also supplies a perfectly fitting rubber dust boot, part number PPL 17-7553. I did not put the new cup seal on the piston because I had to take the piston into Past Parts for them to find a seal and they put the new one on prior to collection. - Assemble Before final assembly make sure the small air hole under the Wabco name plate is clear and put some more felt in it. Evidently the valve needs to breath. I found a couple of small self tappers to hold the plate back on and put a small bit of epoxy in the rivet holes to give the threads a key.Next the cylinder and pistons was smeared with silicone grease making sure there were no lumps left inside that could foul the passages. The pistons were pushed in. It was noticed here how easily the large piston with the O ring on it moved with just finger pressure against the spring where as it had to be forced to move with hydraulics on disassembly. The valve was put back into my wooden jig to get the snap ring back. Put the plunger in and put on the new dust boot. Put the lever system back on with a bit of grease on the pin.
- Install valve back on van. Putting the valve back on the van was tricky. I found the best way is to A) get unions 11 and 12 started away from the bracket but not tightened. B) Slide the valve into place while locating union 21 (feed to rear brakes) and get union 21 started. C) Put in the two 8mm bolts holding the valve to the bracket and tighten. Then tighten all unions.
- Bleed brakes starting with the valve then back wheels and then fronts.
- Adjust. Hook up the spring and slide spring adjuster up the slot to the required position. See notes below. It should be set up by an expert, in my case the MOT man.
NOTE this is my own personal experience, Just after putting this back together I had to do a bit of heavy braking on a wet road. I managed to lock up the back wheels, I had the spring adjusted to three quarters up the quadrant. These are my thoughts on trying to understand the setting of this valve and are a guide only.
A) When the van is fully loaded maximum brake pressure is needed on back and front wheels.
B) When the van is empty more pressure is needed on the front brakes and less on the back. (To avoid back wheels locking up)
C) The valve has a piston (the one with the cup seal on it) that is held in via a plunger which is pushed in by the operating lever. The in position allows maximum pressure to front and back wheel alike. This is the heavy load position. The out position vectors more fluid pressure to the front wheels and less to the back. This is the light load position. (Less braking on the back wheels.)
The piston can only be pushed out with pressure from operating the brake pedal and is relative to tension on the large external spring. The tighter the spring, the more the pressure on the operating lever holding the plunger in, the harder it is to force the piston out. We need the piston to be held in for a heavy load and are allowed to move out with a light load.
D) The large external spring connecting the operating lever to the back axle is under tension and holds the piston in.
E) When the van is loaded the chassis and axle moves closer together tightening the spring, this holds the piston in tighter stopping it from moving to the light load position. In other words it remains in the heavy load position longer under pressure from the brake pedal.
When the van is empty the axle moves away from the chassis slackening the spring. This allows the piston to move out to the light load position earlier when braking.
The van passed the rolling road test for the MOT & the repair seems to be a success. The cylinder walls were in reasonable condition, if they were damaged in any way then it could have been a different story. Past Parts of Bury St Edmunds will supply the seal and dust boot and have suggested that they may do the repair for you. Give them a ring on 01284 750729. This company can also repair your master cylinder and brake callipers.
“Keep em rolling”!!!
VW LT Series 1 Buyers Guide (1975 – 1996)
Table of Contents:
Petrol:
2.0 L I4 (1975-1982)
2.4 L I6 (1983-1996)
Diesel:
2.7 L Perkins I4 (1976-1977)
2.4 L D24 I6 (1978-1996)
2.4 L D24T turbo I6 (1983-1992)
2.4 L D24TIC turbo I6 (1993-1996)
Guide to engine codes here on Wikipedia.
Manuals:
4 cylinder petrol.pdf
4 cylinder diesel.pdf
6 cylinder petrol.pdf
6 cylinder diesel.pdf
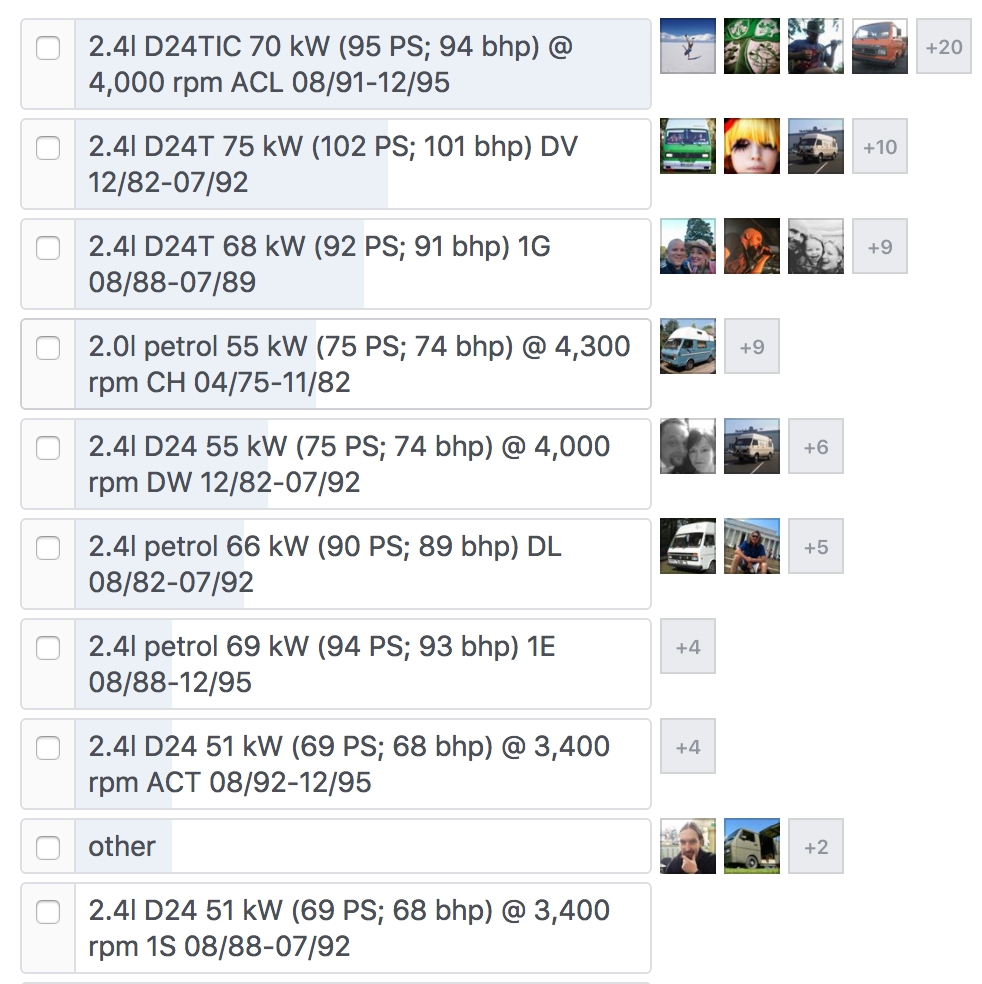
In a recent poll on the VOLT Facebook group the ACL engine appears to be the most commonly fitted:
When buying second hand (i.e. every time!):
Check under the footwell carpet for rot, and in the dash pod for corrosion on the electrics in there, may be an idea to check all lights and indicators are switching on OK and fuel+heat gauges register if the electrics have moisture in them these may be faulty. LT’s are notorious for water ingress into the cab which can gather under the floor mat seemingly appearing from nowhere. Many state leaks around the indicators as the cause, but the lower corners of the windscreen hold water which can leech under the rubber seal, as it ages, and begins its’ journey into the cab. The left hand corner is the directly above the fusebox and gives most concern in right hand drive countries. This is not unusual but can of course lead to rust if not addressed, so… watch for if there has been water ingress is has it started to rot either the interior, beds and units etc. Also check around the handbrake where a rubber grommet is often missing allowing spray to come up around the handbrake into the cab. Seams all around the van are prone to rust due to poor drainage when blocked, an original design flaw.
∧∧∧Back to top
Body
It’s unlikely you’ll find a mk 1 (pre-’96) LT without body work issues. However panels are still available to order so don’t let rust or even welding put you off buying, restoring and keeping. Sills were an LT weak point as are front foot wells and rear wheel arches, and rear corners.
∧∧∧Back to top
Coachbuilts
The big thing in these big things is damp, usually from the joints in the surface skin. If you are looking at a coachbuilt buy a damp meter, from under 10GBP, and check as many areas you can as close to the outer skin as you can. The time of year will have a bearing upon the results. The area around the shower, if fitted, should also be checked. This advice applies to any coachbuilt camper, but it seems that the Karmann coachbuilts on the LT are particularly prone to water ingress at the front and sides of the bed over the cab.
Reading Value Action
0 – 15% No Cause for concern
15-20% Require further investigation Consideration should be given to re-checking the area in three months with the average of all readings taken.
20-30% Remedial work required, there may be early signs of water ingress or evidence of moisture. Resealing and internal work may be required; again, consideration should be given to re-checking the area in three months.
30% Structural damage is occurring, deterioration inevitable. a full strip down of the affected area is required.
Be aware though, that if the vehicle has been stored under a cover and not aired recently, the readings may not be accurate.
∧∧∧Back to top
Seams
As you are probably aware, LT’s tend to rust a little around the body seams, due to modern manufacturing techniques, body tolerances and panel fit have come along way since the “bay window” van (’68-’79) but once muck is in there you are going to have great difficulty getting it out, so be warned. Walk away from a van with rot around the seams unless you are confident you can get rid of it. Most vans are now getting to that age where a little crispiness around the edges is inevitable, also check that all the seams that are meant to be there actually are! A lot of repairers either weld the seams up or fill over them, it WILL be hiding something! Take a magnet with you, if it does not stick, there is no steel.
∧∧∧Back to top
Gutters
With the size of the LT it is quite difficult to wash the roof and gutters so they are often overlooked and hence get blocked which holds water against the panels which eventually leads to corrosion. Some camper conversions featured the addition of high top roofs which involved additional sealant in the gutters. If water is allowed to get under this sealant it can cause a real problem not only in the gutters but down behind them and under the sealant if not addressed. Roof racks also scratch the paint around this vulnerable area and impede the free flow of water away, so when you are going to inspect a van, take something to stand on and take a good look at the state of the guttering (or cantrail to give it its correct name). It is a good idea to give the gutters a good clean out once in a while with some cutting compound or T-cut and give them a thin layer of protective wax such as Finigans Waxoyle.
∧∧∧Back to top
Windows
Sounds silly doesn’t it?, well I’ll explain… it is not actually the windows, rather its frame or surround, windscreen surrounds are prone to corrosion in the bottom corners normally noticed by a small pool of water in the foot wells after rain, although you can’t go pulling someone’s windscreen out when you are thinking of buying it you can probably get away with lifting the corner of the rubber with a small screw driver and having a little sneaky peaky underneath for brown crispy bits, or alternatively you can have a look at the underside from under the dashboard (so remember your torch!). It’s not just the screen you have to watch out for, its converted panel vans, these are the vehicles that left the factory as a delivery van and have had windows “cut” into them. When the hole is cut for the window, the bare metal isn’t often primed or painted so the first time it rains the water runs behind the seal and sits there rotting the metal so watch out for bubbles around these windows.
Factory fitted windows should give you no problems. Some of these parts are still available from VW but alternative sources of similar parts can be used.
∧∧∧Back to top
Front wheel arches
They are a bit of a water trap and hold mud (therefore water) against the interior of the arch. Regular washing is the answer here but if it has already taken hold then watch out for M.O.T failures as the top of the wheelarch lies within the prescribed 30 cm of a seat belt mounting. So check under the matting around the seat belt mounts. Also watch out for the cab step as the rubber anti slip thing holds water underneath it also leading to rot.
∧∧∧Back to top
Rear wheel arches
Without mudflaps to protect the chassis behind the wheels road crud will collect in the holes, ledges and gaps in the chassis and the sills. The chassis tends to come off relatively unharmed, but the thinner metalwork can disappear. Most rear panels are available, and even some floor panels and chassis members are still available from VWClassic.
∧∧∧Back to top
Fuel tank
Feel free to add content here.
∧∧∧Back to top
Doors
Not many problems here, just the window winder knobs fall off just like the rest of the VW’s of the same era. The use of later MK III polo style winders usually works. Window winder mechanisms wear, easy to repair. Doors are interchangeable between years. Window wipers are shared with T3s and so are easily found and replaced. The same problem of water ingress and therefore rust in between the doorskins will ensue.
∧∧∧Back to top
Rear Doors
Not many problems here either, doors are interchangeable. Water can enter through the numberplate light and numberplate mounting holes. It sits in between the skins and corrodes its’ own drain. The door handles and locks do not get used as often as a slider and so can become stiff.
∧∧∧Back to top
Sliding door
(Side loading door). These rot a little along the bottom edge, also watch out for worn door runner bearings resulting in a less than smooth operation of the door.Some sliding door parts are shared with the Bays and T3s which are therefore more easily available.
∧∧∧Back to top
Running gear
A very contentious issue this one.
Firstly, the specifications
- LT28 and LT31 are 5×160 6J14H2 ET51 with M14x1.5 bolts/nuts which have a 60 degree taper
- LT35-LT55 are 6×205 5J14H2 ET120 with M18x1.5 nuts.
5×160/6×205 indicates the number of fixings, 5 or 6, and the pitch circle diameter (PCD) this is the diameter of the circle on which the fixings are centred.
6J/5J. The number indicates the width of the wheel in inches and the letter, the bead profile of the rim.
H2 indicates the double hump profile of the wheel.
ET51/ET120 indicates the offset from the vertical centre of the wheel to the mounting surface.
Although American, this page is useful.http://www.carbibles.com/tyre_bible_pg4.html
Secondly, the contentious part.
LTs are commercial vehicles. The boffins at VW designed the wheels, hubs and fixings, to take the stresses and strains of a fully loaded LT bouncing around on them.
Other manufacturers wheels do ‘fit’ in that they have the same 5×160/6×205 fixings. Wheels can be fitted, through the use of adaptors or redrilling, which have different fixings.
For Lt28/31/35e LT fits (naturally), some Transit wheels fit (after modification), Tata wheels fit (with no modification), Defender wheels fit (with special screws)
This page has useful information. http://www.carlsalter.com/wheel_fitments_by_pcd.html
ANY changes to wheels MUST be passed on the your insurance company.
∧∧∧Back to top
Front suspension
LT28 and LT 31 have coil springs, and all others, LT35-50 use a leaf-sprung beam, including 4×4. Shock absorbers on coil-sprung vehicles should be checked for leaks, but replacements are readily available. Always replace in pairs.
∧∧∧Back to top
Rear suspension
Leaves are supposed to look sad, ie higher in the middle.
∧∧∧Back to top
Front brakes
Feel free to add content here.
∧∧∧Back to top
Rear brakes
The automatic adjusters never seem to work as they should, one of the tags on the back plates corrode and fall off and that’s about it, nothing is hard to replace, cables are straight forward to do, unless they have affixed themselves to the flimsy backplates. Rear brake adjuster bars wear which don’t allow the rear brakes to adjust as they should, this can be rectified by clever filing of the bar.
∧∧∧Back to top
Brake Pressure Regulator
This is the valve above the rear axle which distributes braking force so when empty there is less braking force at the rear wheels, therefore preventing locking up. When loaded, the variable nature of the valve automatically adjusts the braking force so the rear wheels can help more. Before you consider removing it, because it is leaking, that scenario is covered in the MOT test by ‘Evidence that a load sensing valve has been removed or disconnected from a vehicle where it is known to have been fitted as standard ’
They have not been available from VW for a long time, however all is not lost. DAF/Ford/Scania 1518097 is the same part, if you can find one.
The only new parts found so far, 13th February 2016, here.
Parts and breakdown, and of course one of our German friends can rebuild them.
http://www.lt1-forum.de/dokuwiki/doku.php?id=start:reparaturtips:bremskraftregler_instandsetzen
http://www.lt1-forum.de/dokuwiki/doku.php?id=start:reparaturtips:bremskraftregler_wabco_hinterachse
http://www.lt-forum.de/dokuwiki/doku.php?id=start:reparaturtips:bremskraftregler_reparieren
http://www.lt-forum.de/dokuwiki/doku.php?id=start:reparaturtips:bremskraftregler_instandsetzen
Volition82 on Brickyard has replaced his with a modern one and a little bit of mathematics.
http://www.brick-yard.co.uk/forum/rear-brake-pressure-regulator-booster_topic81142_page1.html
∧∧∧Back to top
Gearbox
4 and 5 speed manual gearboxes were available. Regular oil changes are a good idea. An leak oil out of the bell housing, the seal is cheap but you have to take the gearbox out. Don’t be put off by a 4 speed box Gearboxes are broadly indestructible, but do not attempt bumpstarting in reverse, it will probably end badly. The earlier LTs had a four-speed gearbox. It can be swapped for the later fiver-speed but it is only the gap between gears which changes, and not the top gear. First gear is also slightly lower in the five-speed.
∧∧∧Back to top
Differential
Not much to say, except they are not all the same. There are fast and slow ones, 3.79:1 to 6.43:1. Originally matched to specific engines with specific torque curves, nowadays anything goes.
http://www.lt1-forum.de/dokuwiki/doku.php?id=start:wichtige_daten:hinterachse
∧∧∧Back to top
Rear Axle
From new VW gave the option for different speed ratios on the rear axle so many have reported different top speeds. The German LT Freunde wiki has information on the codes and the ratios: http://www.lt-forum.de/dokuwiki/doku.php?id=start%3Awichtige_daten%3Ahinterachse If you’ve got the highest speed rear axle it should go well over 90 (for a short time!) and cruise happily at 75 ish…
∧∧∧Back to top
Electrics
They don’t seem that bad It is just when someone has been messing with them!, Have a poke under the dash and look for scotch locks (or bodge locks as I like to call them) they are those little blue connectors that you squeeze together with pliers, they are OK but…… The printed circuit on the back of the instrument cluster is prone to burning out where it goes around corners and the connector that connects it to the loom often corrodes and causes trouble it is not a risk you want to take so make sure all the warning lights and the dash illumination works, if the fuel gauge and temperature gauges do not work this is probably a diode on the foil, easily repaired,doesn’t work it could be a few things and could lead to fuel tank removal so check it! The youngest wiring is twenty years old now, 2015, and the oldest forty, so oxidisation will have happened within the looms.
∧∧∧Back to top
Engines
There are a few different engines to choose from, to be brutally honest none of the engines are brilliant, the later ACL and 1E would be preferred, it is just which one do you go for. ALL of the petrol engine available for use in the UK are capable of running on unleaded fuel with little or no alterations. LPG conversions help with fuel consumption.
For engine transplants see this forum thread: http://vwlt.co.uk/forum/discussion/5/engine-transplants
The following tables were taken from http://www.lt1-forum.de/dokuwiki/doku.php?id=start:wichtige_daten:daten_motoren
| Petrol | |||||
| Designation | CH | CL | DL | HS | 1E |
| Cylinders | 4 | 4 | 6 | 6 | 6 |
| Capacity cm3 | 1960 | 1984 | 2383 | 2383 | 2383 |
| Installation | Long, vertical | Long, vertical | Long, sloping | Long, sloping | Long, sloping |
| Built from | 1 Aug 75 | 1 May 76 | 1 Jan 83 | 1 Apr 83 | 1 Oct 88 |
| Built to | 1 Dec 82 | 1 Dec 82 | Production ends 95 | 1 Jul 86 | Production ends 95 |
| Power (kW) | 55 | 52 | 66 | 61 | 69 |
| Power (PS) | 75 | 71 | 90 | 83 | 94 |
| @rpm | 4300 | 4300 | 4500 | 4500 | 4200 |
| Torque (Nm) | 150 | 132 | 168 | 160 | 167 |
| @rpm | 2400 | 2400 | 2800 | 2800 | 2400 |
| NA Diesel | |||||
| Designation | CG | CP | DW | 1S | ACT |
| Cylinders | 4 | 6 | 6 | 6 | 6 |
| Capacity cm3 | 2710 | 2383 | 2383 | 2383 | 2383 |
| Installation | Long, vertical | Long, vertical | Long, sloping | Long, sloping | Long, sloping |
| Built from | Jan 76 | Nov 78 | 01/12/82 | Aug 89 | Aug 92 |
| Built to | 01/03/79 | Nov 82 | Jul 91 | Jul 92 | Production ends 95 |
| Power (kW) | 48 | 55 | 55 | 51 | 51 |
| Power (PS) | 65 | 75 | 75 | 69 | 69 |
| @rpm | 3600 | 4300 | 4300 | 3400 | 3700-3800 |
| Torque (Nm) | 152 | 140 | 140 | 145 | 140 |
| @rpm | 2300 | 2500 | 2500 | 1600-1800 | 1800-3000 |
| Turbodiesel | |||||
| Designation | DV | 1G | ACL | ||
| Cylinders | 6 | 6 | 6 | ||
| Capacity cm3 | 2383 | 2383 | 2383 | ||
| Installation | Long, sloping | Long, sloping | Long, sloping | ||
| Built from | Jan 83 | 01/08/1989* | Aug 92 | ||
| Built to | Jul 91 | Jul 92 | Production ends 95 | ||
| Power (kW) | 75 | 68 | 70 | ||
| Power (PS) | 102 | 92 | 95 | ||
| @rpm | 4300 | 3500 | 3500 | ||
| Torque (Nm) | 195 | 195 | 205 | ||
| @rpm | 2500-2600 | 1800-3100 | 2200-3200 | ||
| *Export 88 | |||||
∧∧∧Back to top
Buying spares
Is the part you need available from VW?
For this exercise we will try to find an inner rear chassis member for a 1989 LT28.
Firstly, you need the part number. If you can see it marked on the part you have, that will make life easier, if not then one of these two online VAG catalogues will help.
EKTA There are various emulations of the VW part number database online some of which work better than others. Try OEMEPC or VW.7ZAP (http://www.oemepc.com/vw/main_group/markt/RDW/modell/LT/year/1989/hauptgruppen/1234567890/drive_standart/6/lang/e or https://volkswagen.7zap.com/en/rdw/) for after market part numbers.
Secondly, availability can be ascertained by using the part number in VW Classics’ stock monitoring system, which is also free.
Make a note of, or copy, the part number ready for insertion into the VW Heritagesearch dialogue, in this case 281803713C. The next stage is to access VW ClassicParts via VW Heritage
This part is in stock, and is priced at £120.25, today January 30th 2016.
Now you know it is in Germany, a phone call or email to Brickwerks(https://www.brickwerks.co.uk/) or VW Heritage will get your part winging its’ way to you in a couple of weeks.
Naturally, there are many third party manufacturers for items such as shock absorbers, ignition coils etc, but the part number will help you find the correct part more easily.
VW LT Westfalia Florida Buyers Guide
Thanks go out to Hannibal for kicking this hopefully useful guide off…
Bodywork
Rust, like all old vehicles theres going to be some rust some where.
Area’s to look at ..
- Around the windscreen , seals leak causing rust not only to the outer panel but to the inner one , sometimes simply by pressing the outer panel you can hear the inner one falling apart.
- Also the area around the outer areas of the windscreen where the pillar meets the cross panel.
- The area behind the bumper , anyone who has owned a T3/25 will know this well.
- The panel where the fridge vents are.
- All seams
- Gutter area’s.
- Inner wings , mud and salt collects here and will attract the legendary tin-worm.
- Inner steps , both front and the slider one.
- Cab floors. Now if the windscreen or indicators are leaking then water will collect under the sound proofing and slowly eat away the metal.
Engine
Ok some say it has to be TD, but I have a 2.4D and its ok ,slow on long hills but its OK. Been all over Europe and the UK in her so yeah its OK.
Like all diesels check for smoke from cold. But remember its a big old lump so if its still coughing and farting after say 5 minutes then time to look deeper.
Rough starting , glow plugs ? Air in the system ? Glow plug relay ? Glow plug fuse/s ( there are 2) , old fuel , air filter old and clogged , fuel filters old and clogged/ full of water.
Other things to look out for , inter cooler leaks , turbo not doing it thing , power steering pipes leaking , coolant pipes leaking.
Most of the above can be sorted out fairly easy. Pipes can be made up at say PerTek , and parts can be sourced ebay etc.
∧∧∧Back to top
Gearbox and Diff.
If they are wining or if the gear can not be selectored then maybe think ££££ or walk away.
∧∧∧Back to top
Steering
All parts are available from German Ebay , much cheaper than in the UK.
Ok if its not PAS then don’t think all is lost , just learn to drive it.
∧∧∧Back to top
Service history
Look for receipts for the belts being done in the last 5 years . Not a big or expensive job but it is something to help bring the price down if buying.
Other stuff like oil , filter etc depends on the owner ,I do all my own but save receipts when I remember.
∧∧∧Back to top
Other things ..
- Towbar is a bonus.
- Roof box is a bonus
- Make sure the roof bars are OK but expect maybe a bend or lose bolts.
- Bike rack is a bonus.
- Kayak rack is a BONUS.
- Tyre / wheel size , read up about this. A few members are fitting Ford Transit (16?s) (more here)
- Now Mr VW updated the LT and gave her a face lift again the choice is yours.
- Head Lights , I have both LHD and RHD sets so best of both worlds and it takes 5 minutes to change them.
Remember read other forums , Brickyard is a good start (here’s a thread Tim started when he bought his, and here’s Chappy’s legendary Winter Fettling thread), theres loads out there , and a daft question will always be answered , cause we have all been there.
For sourcing secondhand Florida & SVen Hedin parts start with sourcing the part number from the online EKTA site here: oemepc.com (link to 1989 Florida page)
∧∧∧Back to top
Interior
Water , make sure all the taps work , both hot and cold and in the shower. The original ones will be getting old and loads have been replaced.
∧∧∧Back to top
Water Heater
Make sure the boiler works ,again take your time read more on Brickyard about this (Chappy Thread) . Now the boiler only works on gas so make sure its turned on and getting the supply. There are two valves on the LPG tank and 4 in the rear cupboard next to the fridge. Make sure you understand how this work. OK back to the boiler , some will work only when the van is nice and level , others work at more acute angles. Sometimes the boiler may take a few starts to fire up.
The water tank is under the rear seat , check that for leaks , make sure the sender is working as is the pump. The filler is out side on the rear panel , make sure you have the key for the cap.
∧∧∧Back to top
Heating
Ebberspacher . Like all ebbers a good supply of electricity is needed , so if the leisure battery is on its way out or lacking charge then it will not start up. Simple trick start the engine , make sure the leisure is getting a good voltage and then fire it up. Again service parts are available but may take some tracking down , check your local Ebberspacher place. Again check that diesel supply is getting to the unit and the pump is well pumping … tick tick tick. Another thing is to check all the vents both inlet and outlet , and the exhaust. Main fuse for the ebber is next to the leisure battery under the rear seat. Again check the rotating thermostat isn’t broken , very hard to find a replacement , but other controllers can be fitted.
∧∧∧Back to top
Fridge
Its a 3 way , so check it on gas , 12v and 240v .. simple to work on and parts are available. Remember it will take a hour or so to chill down . Check the auto sparker is working , quick test turn the gas off and it should start ticking .
∧∧∧Back to top
Gas Hob
Again simple , check it has a good clean flame and that the gas turns itself off is the flame goes out , easy repair if the thermocouple if not working.
∧∧∧Back to top
Shower /Toilet
Check its all ok and working. The toilet is stored in the area to the right and is held in place with a fabric/leather belt.
Now some of us have replaced the toilet with a fix one that you have to empty via a put out. But more on that at another time.
∧∧∧Back to top
Roof vents
Check for cracks and that the vent goes right up . Again replacements are available via ebay.
Side upper windows , can blow off if not closed , and replacements are very hard to find.
Lower windows , again I think you can get them via Gunzls but £££ .. Replacement seals are also available.
Blinds , very hard to find , as are the fastening. So check that the clips are all good.
Curtains , check the cab one is there. Nothing out of the ordinary , check the state of them.
Cupboards , check the condition of them.
∧∧∧Back to top
Seating / Beds / pockets
Check the condition of the fabric , foam , zippers etc.
Now the bed is made up of two rock’n’roll ones so check the mechs on them , theres a little catch and spring on the hinge that fails. Again simple things that need checking. The front seat should side easy simply. Check the seat belts while your there.
Again the vans are getting old so the foam may need replacing at some point.
Rubbish bin , again these are replaceable. (ebay)
∧∧∧Back to top
Lighting / Plug sockets
Old style tubes that are easy to replace with led strip or tube.
240v sockets , again these are easy to replace with UK ones is you fancy. Again check the trip fuse on the rear panel.
∧∧∧Back to top
The Table’s
Ok there are 2 . a little pop up one , make sure it locks into place.
The big dining table is stored behind the rear seat , check the condition of this and the fittings. TIP , check out the above cab storage for the table , much easier to use and there is no where to put the table when the bed is down ?!!.
∧∧∧Back to top
Waste tank
Again nothing special , check for leaks and that the drain tap is ok . Tip if your driving along and you get a very strange smell in the cab , like gas or rotten eggs , chances are its your waste tank , bleach or bleach tablets do the trick.
∧∧∧Back to top
Cab area
Again check the seats , fabric of the seat , arm rests and seat belts.
∧∧∧Back to top
Dash
Ok again nothing special , check all the switches work as they should , check the blower works and is blowing on all 3 settings . Check the slide controllers.
Now rev counters came on later vans and are like rocking horse shit , but a VDO one will do the job and take the feed off the W terminal on the back of the alternator.
Glove box , theres an under storage pocket that was available as an add on. Again hard to find.
∧∧∧Back to top
Engine cover
Two types , one with just the hatch for checking the oil , the other has 2 hatches one for checking the coolant.
I also thing (iirc) that the very early vans had a different hatch. But do your research.
∧∧∧Back to top
Extras
Radios , most will have been replaced so check the wiring etc.
Led bulbs in the lights.
Now swivel bases , I’ve only done my passenger side but again more on that at a later date.
Hope this is of some help , feel free to add to this as its a work in progress…
∧∧∧Back to top
VW LT Wiki
Facebook is all very well for getting quick responses from whoever is listening at the time you ask, and forums are OK if you’re technical enough to bother with them, but what’s missing is the ability to easily capture and search the knowledge that is shared and stored in these collective hive minds. Here I attempt to do a little bit of that by sieving through and storing as much of the best bits as I can… starting with an open storage of all the VW LT documentation I could lay my hands on. They are split between petrol & diesel where possible, and listed below where they relate to both: